How to Make a Table Lamp at Home
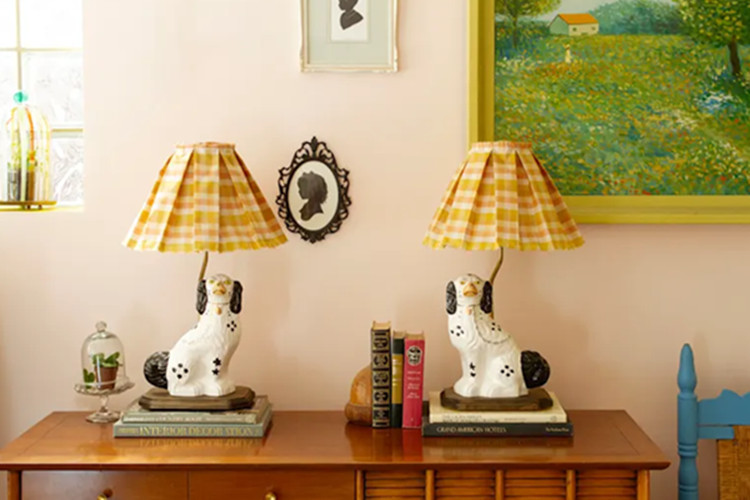
Living in a small space like myself, it's difficult to cram in things that aren't absolutely necessary. So I try to make sure everything in my home has a purpose. But I also love fun and whimsical decor, so when I found these Staffordshire porcelain dog figurines at a thrift store, I bought them without hesitation. I loved them as they were, but I wanted them to be more than just shelf decorations. Transforming them into a table lamp seemed like the perfect solution—practical, beautiful, and a fun focal point.
You might not have a pair of dog figurines lying around like I do (of course, if you don't, I highly recommend getting one), but you can still follow my steps to turn almost anything into a unique and eye-catching table lamp. This project is for everyone—especially those who see something they like but think, "I don't need this! I'll never use this! This is useless!" I'd love to be that little "encouragement" in your ear, helping you find reasons to decorate your home with items that reflect your personality!
Here are the materials you'll need to complete this DIY project:
1) Supplies:
* Your chosen porcelain figurine
* Wooden base
* Figurine arms
* Lamp kit
* Other accessories: washers, neck, nipple extensions
* Lampshade
* E6000 craft glue
2) Tools:
* Needle-nose pliers
* Drill bits and drill rods
* Phillips screwdriver
* Cloth for staining
3) To customize your own lampshade, you'll need:
* Your chosen fabric
* Hammer
* Scissors
* Hot glue gun
* Sewing machine
Before you head out to buy materials, be sure to note the dimensions of your figurine (height, depth, width). The height will determine the length of the figurine arms you need, while the width and length will determine the size of the wooden base you need. Craft stores have a wide variety of bases to choose from in their wood section, but you might have trouble finding the right figurine arms. This website offers everything you need to make your lamp, including any extra accessories (rings, necks, etc.).
1. Drill a hole in the wooden base.
After preparing the wooden base, drill holes using a 3/8-inch drill bit. You can drill the holes for the lamp arm in the most suitable position according to the actual situation of your work, but try not to drill too close to the back edge of the base (otherwise the lamp arm will not be secure). I chose to place the lamp arm in the middle of the back of the base, about an inch from the edge. Before drilling, be sure to carefully check the threads of the lamp arm. Generally, the thread diameter of a table lamp arm is 3/8 inch.
2. Elevate the wooden base and apply stain.
The next step may not be easy to understand before you start doing the actual electrical work, so please be patient! You need to elevate the wooden base so that the wires can pass freely underneath it. There are several different ways to achieve this, but I chose the simplest: nailing on furniture rails. Nail a rail at each corner to elevate the wooden base. After the rails are installed, you can paint or stain the wooden base. I chose a dark walnut color, but you can be completely creative—choose any color you like, and finally apply a coat of protective wax or clear varnish.
3. Install the lamp neck.
One of the additional accessories you can purchase is the lamp neck. The lamp neck screws onto the end of the puppet arm, helping to secure it to the base. It also provides a nice transition, making your table lamp look like it was made by a professional! Attach the lamp neck to the puppet arm (as shown in the picture), then screw the puppet arm into the wooden base. You will also need to install a locking washer and another lamp neck near the top of the puppet arm. Be sure to leave some space for the harp base and lamp holder cover; if there isn't enough space, you can screw a short connector into the top of the lamp neck to increase the space.
4. Assemble the lamp parts.
Open the lamp kit and remove the lamp stand base and lamp holder. Place the lamp stand base on the lamp holder, then place the lamp holder cover and tighten the screws until the lamp holder cover is secure. Run the wire from the bottom of the wooden base all the way to the top of the table lamp holder cover. You may need to twist the wires together first so that the wires can easily pass through the lamp arm.
Slightly separate the two wires and then tie a lamp wire knot (also called a safety knot). This knot is easy to tie and crucial for preventing accidental pulling or detachment of the wires. Your table lamp set should have a simple diagram; if not, this tutorial is a good alternative.
5. Secure the wires.
Next, you need to connect the exposed portion of each wire to the two screws inside the socket. You'll notice that one wire has a textured sheath, and the other is smooth; the smooth sheath connects to the brass screw, and the textured sheath connects to the nickel screw. Use needle-nose pliers to bend the exposed wire into a "C" shape so that it fits perfectly onto the screw. Once the wire is in place, tighten the screw.
Press the internal parts of the lamp holder downwards, then completely cover it with the lamp holder housing. That's it! Your table lamp is now plugged in! I like to install the bulb at this point to check that everything is working correctly.
6. Complete the assembly.
At this point, you can continue assembling the lamp stand unless you use an Uno lamp holder on the lampshade like I did (this type of lamp holder sits directly on the lamp base and doesn't require a table lamp stand). Then, glue the figurines to the wooden base.
I repeated these steps once, and just like that, I had two perfectly symmetrical figurine lamps!
You could stop here and use a ready-made lampshade, but I felt my unique table lamp deserved an equally unique shade. Here's how I made my custom lampshade:
7. Measure the blackout curtain frame and choose the fabric.
To match the "grandmotherly" theme, I decided to use a pretty pink and yellow checkered silk fabric for the lampshade. I first made a skirt-like pleat and then draped it over the fabric lampshade to create my own pleated lampshade. I say "my own" because once I figured out how to make pleats, I just estimated the dimensions by feel—otherwise, if I had followed the steps strictly, measuring as I went, it would have taken me hours. Now, I made two ironable lampshades in less than 20 minutes. Ironing the pleats is very important. Iron it once, then iron it again, ensuring the pleats are flawless.
Here are my secrets to creating perfect box pleats:
First, measure the circumference of the lampshade opening, then multiply by 4 to calculate the amount of fabric needed. Generally, multiplying the fabric amount for box pleats by 3 is sufficient, but depending on the lampshade's angle, it's best to have extra fabric to adjust accordingly.
If your fabric allows, you can spray it with starch to create very defined pleats.
Using stripes or checks allows for quick and easy sewing of straight lines—I highly recommend it!
After finishing the "skirt," I sewed the top together with a sewing machine and then glued it to the lampshade with hot glue. The soft yellow and pink hues create the warmest and most beautiful light at night. I love the final result!